

This comprehensive syllabus is based on the 2026 practical driving test.
Use it as a checklist to track your progress. Once you feel confident completing each task independently, we can take a mock driving test to assess whether you are ready for the real test.
🔧 1. Cockpit Drill
Before You Move
What this is: Your “get ready” routine — making sure the car is safe, comfortable, and set up properly. Highway Code: Rule 97 Common fails: Poor mirror setup, rushed start, wrong seating position
🔒 Doors Secure Make sure all doors are properly closed so nothing opens while driving.
🪑 Seat Position Adjust your seat so you can reach pedals comfortably and see clearly.
🛡️ Head Restraint Set it level with the back of your head for protection in a collision.
🪞 Mirrors Adjust interior and door mirrors so you can see behind and to the sides clearly.
🔗 Seatbelt Belt flat, firm, untwisted, and clicked in.
🌫️ Windows Clear Ensure windows are clean, demisted, and free from obstructions.
⚙️ Gear Positions (P, R, N, D) Know what each gear position does before you start driving.
🦶 Left Foot Resting Safely Keep your left foot on the footrest to avoid accidental pedal use.
💡 Controls Familiarity Know where indicators, lights, wipers, demisters, and horn are.
⛽ Fuel & Warning Lights Quick check for fuel level and any dashboard warnings.
👁️ 1. Eyesight Check
What this is: You must show you can read a number plate from 20 metres — proving your eyesight is safe for driving.
Highway Code: Rule 92 Common fails: Not wearing glasses/contacts.
🛠️ 2. Vehicle Safety Questions (Show Me / Tell Me)
* more detailed information at the bottom of the page
What this is: You answer simple questions to show you understand basic car safety, like checking lights or using the demister.
Highway Code: Rule 97 Common fails: Not knowing basic controls.
🟦 CONTROL (Smooth, Safe Car Handling)
⚡ 3. Accelerator Control
What this is: Using the gas pedal gently so the car moves smoothly.
Highway Code: Rule 160 Common fails: Harsh acceleration.
🐢 4. Creep Control
What this is: Moving the car very slowly and steadily, usually when reversing or parking.
Highway Code: Rule 202 Common fails: Reversing too fast.
🛑 5. Footbrake Control
What this is: Slowing down smoothly and early.
Highway Code: Rule 104 Common fails: Harsh braking, late stopping.
🔄 6. Steering Control
What this is: Turning the wheel smoothly and keeping the car steady.
Highway Code: Rule 160 Common fails: Drifting, one‑hand steering.
⚙️ 7. Gears
What this is: Choosing the correct gear at the right time and avoiding coasting.
Highway Code: Rule 122 Common fails: Coasting, wrong gear.
🅿️ 8. Handbrake / Parking Brake
What this is: Using the handbrake to keep the car still when stopping or parking.
Highway Code: Rules 114, 117, 239 Common fails: Rolling back, selecting Park too early.
Parking: Handbrake → Park (P)
Short stops: Handbrake → Neutral (N)
Moving off: Gear first → 360° check → handbrake last
🚘 9. Balance of the Vehicle
What this is: Keeping the car stable and smooth at all times.
Highway Code: Rule 160 Common fails: Jerky control.
👀 OBSERVATION & AWARENESS
🪞 10. Mirrors Before Signalling
What this is: Checking mirrors before signalling so you know who will be affected.
Highway Code: Rule 161 Common fails: Signalling without checking.
🔄 11. Mirrors When Changing Direction
What this is: Checking mirrors before turning left or right.
Highway Code: Rule 161 Common fails: Turning without mirror checks.
🐌 12. Mirrors When Slowing Down
What this is: Checking behind before braking so you don’t surprise anyone.
Highway Code: Rule 161 Common fails: Braking without checking.
👁️🗨️ 13. Awareness & Planning
What this is: Looking ahead, spotting hazards early, and planning your actions calmly.
Highway Code: Rules 154–159 Common fails: Reacting late, missing hazards.
↔️ 14. Clearance to Obstructions
What this is: Leaving safe space when passing parked cars, cyclists or pedestrians.
Highway Code: Rule 163 Common fails: Passing too close.
🔔 SIGNALS (Clear Communication)
👉 15. Giving Signals
What this is: Using indicators only when they help others understand your intentions.
Highway Code: Rule 103 Common fails: Unnecessary signalling.
⏱️ 16. Timing Signals
What this is: Signalling at the right moment — not too early or too late.
Highway Code: Rule 103 Common fails: Poor timing.
❌ 17. Correct Signal Use
What this is: Avoiding misleading signals and cancelling indicators properly.
Highway Code: Rule 104 Common fails: Forgetting to cancel.
🚦 RESPONSE TO SIGNS & SIGNALS
🛑 18. Traffic Signs
What this is: Understanding and obeying road signs like speed limits and warnings.
Highway Code: Rules 109–112 Common fails: Ignoring speed limits.
➖ 19. Road Markings
What this is: Following painted lines and markings on the road.
Highway Code: Rules 127–132 Common fails: Stopping over lines, blocking junctions.
🚦 20. Traffic Lights
What this is: Stopping correctly at red and amber lights.
Highway Code: Rules 175–178 Common fails: Creeping at red.
🧍 21. Signals from Others
What this is: Reacting safely to signals from pedestrians, cyclists or emergency vehicles.
Highway Code: Rule 105 Common fails: Ignoring signals.
👮 22. Police / Officer Signals
What this is: Following hand signals from police or traffic officers immediately.
Highway Code: Rule 107 Common fails: Hesitation.
🚗 RESPONSE TO OTHER ROAD USERS
🚘 23. Meeting Situations
What this is: Handling situations where you meet oncoming traffic in narrow spaces.
Highway Code: Rules 166–167 Common fails: Forcing through gaps.
🔁 24. Crossing Traffic
What this is: Judging safe gaps when turning right or crossing a main road.
Highway Code: Rules 170–172 Common fails: Pulling out dangerously.
⬆️ 25. Overtaking
What this is: Passing slower vehicles safely and legally.
Highway Code: Rules 162–169 Common fails: Overtaking too close.
🔀 26. Merging
What this is: Joining traffic smoothly, especially at lane closures or slip roads.
Highway Code: Rule 134 Common fails: Cutting in, not merging in turn.
🚦 SPEED & PROGRESS
🏎️ 27. Appropriate Speed
What this is: Driving at a speed suitable for the road, weather and traffic.
Highway Code: Rules 124–126 Common fails: Too slow or too fast.
🕒 28. Undue Hesitation
What this is: Going when it’s safe — not freezing or waiting too long.
Highway Code: Rule 170 Common fails: Waiting unnecessarily.
🚗💨 29. Normal Progress
What this is: Keeping up with safe traffic flow without holding others up.
Highway Code: Rule 169 Common fails: Driving too slowly.
🚘 JUDGEMENT
⬆️ 30. Overtaking
What this is: Choosing safe moments to overtake.
Highway Code: Rules 162–169 Common fails: Misjudging distance.
↔️ 31. Meeting
What this is: Deciding who should give way when the road narrows.
Highway Code: Rules 166–167 Common fails: Squeezing through.
🔁 32. Crossing
What this is: Choosing safe gaps when crossing paths with other vehicles.
Highway Code: Rules 170–172 Common fails: Poor gap selection.
🧭 POSITIONING
📏 33. Normal Driving Position
What this is: Keeping your car in a safe, steady position in your lane.
Highway Code: Rule 137 Common fails: Drifting too close to kerb or centre line.
🛣️ 34. Lane Discipline
What this is: Staying in the correct lane and following arrows and markings.
Highway Code: Rules 138–143 Common fails: Wrong lane choice.
🧭 JUNCTIONS
(All covered under Highway Code Rules 170–176)
T‑junction — A road meets another at a “T”.
Y‑junction — Two roads meet at a shallow angle.
Crossroads — Two roads cross each other.
Staggered junction — Two offset junctions.
Offset junction — Roads don’t line up.
Hidden junction — Hard to see until close.
Blind junction — No visibility until you creep forward.
Slip‑road junction — Joining/leaving fast roads.
Dual‑carriageway junction — High‑speed gap judgement.
One‑way system junction — Traffic flows one way only.
Filter‑lane junction — Dedicated turning lane.
Driveway junction — Cars may emerge suddenly.
Multi‑lane junction — Several lanes and markings.
🐌 35. Approach Speed
What this is: Slowing down early before junctions.
Highway Code: Rule 170 Common fails: Approaching too fast.
👀 36. Observation
What this is: Looking properly in all directions before emerging.
Highway Code: Rule 170 Common fails: Not looking enough.
➡️ 37. Turning Right
What this is: Positioning correctly and judging gaps when turning right.
Highway Code: Rule 172 Common fails: Poor positioning.
⬅️ 38. Turning Left
What this is: Checking mirrors and watching for pedestrians/cyclists.
Highway Code: Rule 170 Common fails: Cutting across vulnerable road users.
❌ 39. Cutting Corners
What this is: Following the correct turning path without drifting wide.
Highway Code: Rule 182 Common fails: Unsafe wide turns.
🔁 ROUNDABOUTS
(All covered under Highway Code Rules 184–190)
Standard roundabout — Normal multi‑exit roundabout.
Mini roundabout — Small painted circle.
Double roundabout — Two roundabouts close together.
Linked roundabouts — A series of roundabouts.
Spiral roundabout — Lanes spiral outward.
Turbo roundabout — Raised lane dividers.
Multi‑lane roundabout — Many lanes.
Signal‑controlled roundabout — Traffic lights manage entry.
Rural roundabout — High‑speed approaches.
Large multi‑exit roundabout — Complex layout.
🐌 40. Approach
What this is: Choosing the correct lane early and slowing down smoothly.
Highway Code: Rule 184 Common fails: Wrong lane choice.
👀 41. Observation
What this is: Looking ahead and to the right for safe gaps.
Highway Code: Rule 185 Common fails: Entering without checking.
➖ 42. Lane Discipline
What this is: Staying in your lane and following arrows.
Highway Code: Rule 186 Common fails: Drifting lanes.
🔙 43. Signalling
What this is: Signalling left when exiting the roundabout.
Highway Code: Rule 186 Common fails: Signalling too early or not signalling off.
✋44. Controlled Stop (Emergency Stop)
What this is: A sudden, sharp stop carried out safely when the examiner says “STOP!”. It checks your reaction time, brake control, and post‑stop observation. If the examiner chooses to test this, they will warn you beforehand that it may happen.
Highway Code: Rule 118 Common fails:
Slow reaction to the STOP command
Slamming the brakes too hard
Steering while braking
Forgetting to check mirrors after stopping
Not securing the car before moving off again
😌 ATTITUDE & BEHAVIOUR
💛 45. Courtesy
What this is: Being polite, patient and considerate to everyone.
Highway Code: Rule 147 Common fails: Impatience, pressuring others.
🎧 46. Following Instructions
What this is: Listening carefully and asking if unsure.
Highway Code: Rule 160 Common fails: Guessing instead of asking.
💪 47. Confidence
What this is: Driving positively but safely — not timid, not aggressive.
Highway Code: Rule 148 Common fails: Over‑cautious or overly bold driving.
🛣️ Highway Code – Hierarchy of Road Users
The hierarchy exists to remind car drivers that some road users are more vulnerable and must be given extra care and priority.
1. Pedestrians (Most Priority)
Pedestrians are the most vulnerable, so car drivers must take extra care around them.
What car drivers must do:
-
Give way to pedestrians crossing or waiting to cross at junctions.
-
Slow down near schools, crossings, shops, buses, and residential areas.
-
Never force pedestrians to hurry or step back.
-
Be prepared for sudden movement (children, elderly, mobility‑impaired).
🚴 2. Cyclists
Cyclists are vulnerable and can be hard to see.
What car drivers must do:
-
Leave at least 1.5 metres when overtaking (more at higher speeds).
-
Do not cut across cyclists when turning left.
-
Expect cyclists to ride in the centre of the lane on narrow roads.
-
Check mirrors and blind spots before changing direction.
🛴 3. Horse Riders
Horse riders are unpredictable and easily frightened.
What car drivers must do:
-
Pass horses at 10mph and give 2 metres space.
-
Avoid revving, harsh acceleration, or loud noises.
-
Slow down early and be prepared to stop.
🎯 Summary for Car drivers
✔️ Pedestrians → Top priority
✔️ Cyclists → Give space, don’t cut across
✔️ Horse riders → Slow and wide
✔️ Car drivers → Carry responsibility to protect others
✔️ Larger vehicles → Give space, avoid blind spots
Reversing Manoeuvres
The examiner will normally ask you to complete one of the following:
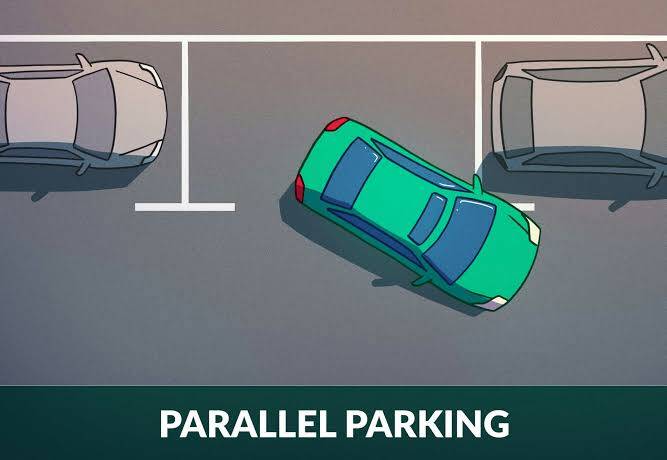
✅ Step-by-Step Procedure
📍 1. Prepare & Approach
- Examiner directs you to park on the left just before the vehicle you are using— fully on the road, facing towards or away from you
The examiner asks you to perform the manouvre
- Select Drive → do a full 360° all-round check → proceed only when safe
- Approach as if overtaking → keeps perfect, consistent side distance
- Stop slightly past the car, so you are looking out of the side window across the bonnet or boot
- Always signal left when approaching — other road users may appear unexpectedly
⏮️ 2. Position to Reverse
- Handbrake ON → select Reverse
- Do another full 360° check before moving
- Reverse slowly and smoothly until your rear end fully clears the parked car
🎯 3. Steer Into Space
- Turn gently toward the kerb to roughly a 45° angle
- Check your right-hand blind spot on this phase
- As you reverse, steer gradually away from the kerb in steps to straighten up — finish:
- ✅ 30–40 cm from the kerb
- ✅ Perfectly parallel and aligned with the car ahead
🔒 4. Secure & Finalise
- Handbrake ON → select Park (P)
- Adjust as needed — corrections are fully allowed and expected
👀 What the Examiner Looks For
- 🔄 Observation at every stage — full checks before every move, throughout the whole manoeuvre
- 🐢 Slow, controlled speed — always slow enough to stop instantly; smooth and steady
- 📏 Accurate positioning — consistent distance when approaching; final gap no more than 40 cm; perfectly parallel
- 🤝 Full awareness of others — give way to pedestrians, cyclists and traffic; stop immediately if anyone approaches
- 🛡️ Kerb — wheels may scuff the kerbside, must never mount the kerb
- ✅ Properly secured — handbrake applied + Park selected
⚠️ Common Reasons for Faults / Fails
🔄 Observation Errors
- Missing blind-spot checks or only looking one way
- Starting to move before completing your observations
- Forgetting to check when changing steering direction
⚡ Speed & Control Issues
- Reversing too fast → unable to stop quickly if needed
- Jerky steering or uneven, hesitant movement
- Correcting too late → crooked or uneven path into the space
📍 Positioning Mistakes
- Too far from the parked car when approaching → ends up far from the kerb
- Mounting the kerb
- Finishing more than 40 cm from the kerb
- Not parallel → crooked or angled in the space
🔔 Signalling Faults
- Signal not selected if other road users would benefit
🧭 Awareness & Courtesy
- Failing to give way to pedestrians, cyclists or passing vehicles
- Ignoring approaching traffic
🔒 Finishing Incorrectly
- Not correcting your position when it’s clearly wrong
- Car still moving when securing it

1. Observation (Safety First)
This is the most important part of the manoeuvre. Missing proper checks is one of the most common reasons learners pick up a serious fault.
- Make 360-degree checks: Before the car moves, have a really good look all around, including physical checks over both shoulders.
- Keep scanning: Keep checking what is around you throughout the whole manoeuvre—not just when you first start moving.
- Respond to hazards: If a pedestrian, cyclist or another vehicle comes close, stop straight away and wait until they have passed or the area is clear.
- Use the rear window: When reversing, look mainly through the rear window and use your mirrors to help judge the sides of the car.
2. Accuracy (Finishing Position)
The examiner just needs to see that you finish in a safe, suitable parking position.
- Stay within the lines: All four wheels need to finish completely within the white lines of the bay you have chosen.
- It does not need to be perfect: You do not need to be exactly in the middle of the bay, and your wheels do not have to be perfectly straight, as long as the car is safely within the lines.
- Leave enough room: Try not to park so close to another vehicle that people cannot open their doors safely.
3. Control (Vehicle Management)
Show that you can keep the car under control and complete the manoeuvre nice and smoothly.
- Speed: Keep the car at an absolute crawl—walking pace or slower. If you are in an automatic, use gentle brake pressure to keep your speed under control.
- Steering: Steer smoothly and at the right time instead of making sudden corrections. Try not to cross your hands on the wheel.
💡 Key Test-Day Rules for Automatic Drivers
- You can correct your position: If you spot that you are at an angle or heading over a line, it is absolutely fine to pull forward, straighten up and reverse back into the bay. Correcting safely will usually mean a driving fault, while finishing outside the lines could lead to a serious fault.
- You choose the bay: The examiner will ask you to park in “any convenient bay”, so they will not tell you exactly which space to use. You can choose a bay on either the left or the right.
- Checking by opening the door: You can open your door to check your position against the lines before finishing, as long as it is safe to do so. Just apply the handbrake and select Park first.

Forward bay park
There’s no set pattern to follow. Just pick a suitable bay, drive in carefully, then reverse out — using your observations and judgement the whole time. The examiner wants to see safe, aware and natural driving at every stage.
Your Golden Rule — Every Time You Move
This simple routine helps keep you safe and shows the examiner that you’re in control.
Phase 1 — Drive Into the Bay
Before Moving Forward
- ✅ Apply the handbrake
- ✅ Select Drive (D)
- ✅ Check all around — ahead, behind, both sides and over both shoulders
- ✅ Watch out for pedestrians, cyclists, people walking between vehicles and approaching traffic
- ✅ Pick a clear, spacious bay — it’s your choice
- ✅ Move only when you’re sure it’s safe
While Driving In
- Keep checking around you — don’t just look once and stop
- Use your view through the windscreen and side windows as your main guide; use mirrors for small adjustments
- Approach at walking pace, using light brake pressure to control your speed
- Try to be as far from the bay on approach, steer smoothly into the bay and make gentle adjustments to stay between the lines
- Don’t rush. Take your time, judge the space and make small corrections if you need to
Once Parked
- Bring the vehicle to a complete stop
- ✅ Apply the handbrake
- ✅ Select Park (P)
- ✅ Cancel any signal
- ✅ Make sure the vehicle is secure — the wheels don’t have to be perfectly straight
If You Need to Adjust
- Come to a complete stop
- ✅ Apply the handbrake
- ✅ Select Reverse (R)
- ✅ Check all around
- Reverse slowly to make some space, then move forward into the bay to correct your position safely
- It’s fine to make a correction — it will usually be no more than a minor fault
Phase 2 — Reverse Back Out
Before Moving Back
- ✅ Apply the handbrake
- ✅ Select Reverse (R)
- ✅ Check all around — mirrors, rear window, both shoulders and the aisle behind you
- ✅ Make sure nobody is walking behind you and no vehicles are approaching
- ✅ Move only when the space is clear
While Reversing
- Keep looking all around — through the rear window, side windows and over both shoulders
- Don’t rely only on mirrors or a reversing camera — direct vision gives you the clearest view
- Move slowly, using light brake pressure to control your speed
- Reverse in a smooth arc towards the aisle
- If anyone moves into your path, stop straight away and wait until it’s clear before carrying on
Once Positioned to Leave
- Come to a complete stop
- ✅ Apply the handbrake
- ✅ Select Drive (D)
- ✅ Check all around — especially your left blind spot and any oncoming traffic
- ✅ Signal if needed
- ✅ Move off safely when there’s a suitable gap
- Match your speed to the flow of traffic as you re-join
Control — Smooth & Confident
- Keep your speed slow and steady throughout — walking pace is ideal
- Steer gently and early; try to avoid rushed or jerky movements
- Keep your hands relaxed and natural on the steering wheel
- Your automatic handles the power — your job is to watch the space around you and keep things safe
What Counts on Test Day
- ✅ Handbrake → gear → full observation — every time you move
- ✅ You choose the bay — go for one you feel comfortable using
- ✅ Driving in and reversing out both matter equally when it comes to safety and awareness
- ✅ Corrections are allowed — stop, check, adjust and carry on
- ✅ Keep observing throughout — stopping to wait shows good judgement
- ✅ Safety matters more than perfection — stay within the lines, leave space to open the doors and never rush

This manoeuvre is all about your observation, judgement, control and awareness of other road users. In an automatic, you can give your full attention to the road and what’s happening around you — make the most of it.
Phase 1 — Pull Up on the Right
Choose a Safe, Legal Spot
Find a straight stretch of road — steer clear of junctions, bends, bus stops, driveways and double yellow lines.
Make sure there’s enough room and that traffic can clearly see you from both directions.
Double-check that it’s legal to stop there by looking for signs and road markings.
Check & Signal
Check your mirrors first, then your right blind spot — have a proper look over your right shoulder.
Signal right if it helps other road users understand what you’re planning to do.
Keep checking — take another look just before you move.
Cross to the Right Side
Move across only when oncoming traffic is completely clear and far enough away.
There’s no need to force it or rush — just wait if you need to.
Move over slowly and steadily.
Park Correctly
Bring the car to a stop straight and parallel to the kerb.
Park close to the kerb — ideally 30–40 cm away, without touching or mounting it.
Keep the car still and under control.
Secure the Vehicle
Apply the handbrake firmly.
Select Park (P).
Cancel your signal.
Keep watching what’s around you — especially passing traffic, cyclists and pedestrians.
Phase 2 — Reverse Back About Two Car Lengths
Select Reverse (R) — only move when you’re sure it’s safe.
Do a full 360° visual check —Look out for pedestrians, cyclists, approaching vehicles and anyone stepping out from between parked cars.
Reverse for around two car lengths, or until the examiner asks you to stop.
Keep your speed really low — use light pressure on the brake to stay in control.
Keep observing the whole time — look all around, rather than focusing on just one mirror or the camera.
Stay parallel to the kerb as you reverse.
If another road user — a vehicle, cyclist or pedestrian — comes near or needs the space, stop straight away.
Wait until they’ve passed or you are clear what they’re doing.
Only carry on when you know it’s safe — stopping and waiting shows good judgement.
Once you’ve reversed far enough, come to a smooth stop.
Apply the handbrake.
Select Park (P)
Phase 3 — Re-join Traffic
Select D
Do a full 360° visual check
Signal if required
Make sure the road is clear both ahead and behind you.
Move Off

These are the official DVSA questions with answers tailored specifically for the Nissan Juke.
✅ SHOW ME — Answered while driving
(Examiner will ask one of these on the move)
1. Show me how you wash and clean the rear windscreen
Twist the end of the right‑hand wiper stalk forward. Hold to spray and wipe; release to stop.
2. Show me how you wash and clean the front windscreen
Pull the right‑hand wiper stalk toward you briefly. The washer will spray and wipers will run.
3. Show me how you would switch on your dipped headlights
Turn the dial on the left‑hand stalk to the headlight symbol. Dipped headlights come on automatically.
4. Show me how you would set the rear demister
Press the rear demister button on the dash — marked with a rectangle and three upward arrows. An orange light shows it’s active.
5. Show me how you would operate the horn
Tap the centre of the steering wheel briefly — only when safe to do so.
6. Show me how you would demist the front windscreen
Set air direction to the windscreen symbol, increase fan speed, select warm temperature. Use air conditioning for faster clearing.
7. Show me how you would open and close the side window
Use the switch on the driver’s door — push down to open, pull up to close.
✅ TELL ME — Answered before starting the engine
(Examiner will ask one of these before you drive)
1. Tell me how you would check the brakes are working before starting a journey
The pedal should feel firm, not spongy. When moving off gently, the brakes should bite smoothly without pulling to one side.
2. Tell me where you would find the information for the recommended tyre pressures and how to check them
Check the plaque on the driver’s door frame or inside the fuel filler flap. Use a reliable gauge when tyres are cold. Don’t forget the spare.
3. Tell me how you would make sure your head restraint is correctly adjusted so it provides the best protection in the event of a crash
Adjust it so the rigid part is level with your ears or eyes, and as close to the back of your head as is comfortable.
4. Tell me how you would check the tyres to ensure they have sufficient tread depth and that their general condition is safe to use on the road
Minimum legal limit is 1.6mm across the central three‑quarters of the tyre. Check there are no cuts, bulges or uneven wear.
5. Tell me how you would check that the headlights and tail lights are working
Turn the lights on using the left‑hand stalk to the second position. Walk around the vehicle to confirm all lights are working.
6. Tell me how you would know if there is a problem with your anti‑lock braking system (ABS)
The ABS warning light on the dashboard will stay on or come on while you’re driving.
7. Tell me how you would check the direction indicators are working
Switch on the hazard warning lights. Explain you would walk around the vehicle to check both front and rear indicators are flashing.
8. Tell me how you would check the brake lights are working
Press the brake pedal. Check the reflection in a window or garage door, or ask someone to confirm they’re on.
9. Tell me how you would check the power‑assisted steering is working before starting a journey
With the engine running, apply light pressure to the steering wheel — you should feel it become lighter as the power assistance works. It should respond immediately when you start to move.
10. Tell me how you would switch on the rear fog lights and when you would use them
First switch on dipped headlights, then pull the light control dial out or press the fog light button. Use them only when visibility is less than 100 metres. Turn them off as soon as visibility improves.
11. Open the bonnet Engine oil level — show me where you would check the engine oil level and how you would do it
Locate the dipstick - Pull it out, wipe clean, push fully back in, pull out again — level should be between MIN and MAX.
Engine Oil (Filler & Dipstick):
Oil Filler Cap: Positioned right on top of the main engine block. It is usually a prominent black or yellow twist cap marked with an oil can symbol.
Dipstick: Located near the front or side of the engine block. It features a bright, easy-to-pull plastic loop handle (usually yellow or orange).
12. Open the bonnet engine coolant level — show me where you would check the engine coolant level and how you would do it
Locate the coolant expansion tank. Level should be between the MIN and MAX marks. Never remove the cap when the engine is hot.
Engine Coolant Reservoir: Located on the front-right side of the engine compartment (closer to the battery and radiator). It is a translucent plastic tank featuring MAX and MIN lines moulded into the side. Warning: Never open this cap when the engine is hot
13. Open the bonnet brake fluid level— show me where you would check the brake fluid level and how you would do it
Locate the translucent brake fluid reservoir. Fluid should sit clearly between the MIN and MAX lines. Ensure the lid is fitted securely.
Brake Fluid Reservoir: Located at the very back of the engine bay on the driver's side, directly in front of the steering wheel and close to the windscreen.
14. Tell me how you would check the parking brake for excessive wear
Apply the parking brake. It should hold the vehicle firmly on a slope. It should click roughly 3 to 4 times before fully securing.
Final Check
Before your test, make sure you can carry out each task safely, smoothly and without prompting. Your aim is not simply to know the procedures, but to make them part of your normal driving routine.